Wednesday, December 31, 2014

ANNOUNCEMENT - NEW FROZEN INSPIRED BOWS COMING SOON!

Here at The Art of Ogygia we are extremely excited, happy and proud to announce that:
  FROZEN THEMED BOWS ARE COMING THIS FEBRUARY!
  Frozen themed bows are due to arrive in our ebay store this February! 
Look out for Elsa, Anna and Olaf!
CUSTOM ORDERS NOW AVAILABLE!
Need a specific bow for an event/to go with an outfit? Leave a request in the comments section below or email us: theartofogygia@gmail.com.au 
  
Check the hair bows we have available on our EBAY STORE

WORLD WIDE DELIVERY 
FREE SHIPPING IN AUSTRALIA


Tuesday, December 16, 2014

NEW ALICE IN WONDERLAND THEMED HAIR BOW!

INTRODUCING....


The Alice hair bow has just arrived at our Ebay store!
The design is based on the Alice in Wonderland film by Tim Burton.

BUY NOW! 


Alice Hair Bow.


Alice Hair Bow.
 
Alice - from Tim Burton's Alice in Wonderland.


Sunday, November 30, 2014

NEW ALICE IN WONDERLAND THEMED BOW!

INTRODUCING...

The Mad Hatter hair bow has just arrived at our Ebay store!
The design is based on the Alice in Wonderland film by Tim Burton.

The Mad Hatter themed hair bow.

The Mad Hatter themed hair bow.

 
The Mad Hatter - from Tim Burton's Alice in Wonderland.


NEW ALICE IN WONDERLAND THEMED BOW!

INTRODUCING...

The White Queen themed hair bow has just arrived at our ebay store! 
The design is based on the Alice in Wonderland film by Tim Burton.

 
The White Queen themed hair bow.

The White Queen - from Tim Burton's Alice in Wonderland.


Monday, November 17, 2014

ANNOUNCEMENT!

Here at The Art of Ogygia we are extremely excited, happy and proud to announce that:

ALICE IN WONDERLAND THEMED BOWS ARE COMING THIS DECEMBER!

Alice in Wonderland themed bows (based on the Tim Burton film) are due to arrive in our ebay store this December! Look out for Alice, The Mad Hatter, The White Rabbit, The White Queen, The Queen of Hearts and The March Hare (and his spoon)!
CUSTOM ORDERS NOW AVAILABLE!
Need a specific bow for an event/to go with an outfit? Leave a request in the comments section below or email us: theartofogygia@gmail.com.au 
  
Check the hair bows we have available on our EBAY STORE

WORLD WIDE DELIVERY 
FREE SHIPPING IN AUSTRALIA 

Tuesday, October 21, 2014

NEWS!


***NEW THEMED HAIR BOW STYLES COMING SOON!***

New themed hair bows styles and hair bow clips coming soon to our ebay store!
Have any suggestions for themes? Or requests? Let us know in the comments below!

CUSTOM ORDERS NOW AVAILABLE!
Need a specific bow for an event/to go with an outfit? Leave a request in the comments section below or email us: theartofogygia@gmail.com.au 
  
Check the hair bows we have on our EBAY STORE

WORLD WIDE DELIVERY 
FREE SHIPPING IN AUSTRALIA 

Monday, September 29, 2014

Decoupaged - Wall Name Art

Decoupaged-Wall Name Art

Want to make a sign or put your child's name up on their bedroom wall - but you want something different, that matches the room perfectly and is generally rather spectacular and unique???

Well seek no more my DIY-ers! Now you can make your own uniquely designed, perfectly matching and rather spectacular wall name art!

STEP 1: COLLECT YOUR INGREDIENTS :)

For this DIY project you will require:
  • Canvas - enough pieces to spell out the name/word you would like up on your wall, I used a small sized canvas
  • Mod Podge
  • Decoupage Varnish
  • Foam Brushes (by Mont Marte)
  • Scissors
  • Printed copies of the letters that spell the word
  • Prints that you would like to decoupage - I have gone with the Paris themed prints I like, mostly because I already had them printed, cut out and ready to roll - but you can choose to use anything you like
  • Stick on rhinestones - or various other embellishments  

Decoupage-ing tools!
 
HANDY HINT: 
Never decoupaged before and want to know how? No problem! Hop on youtube and check out some how-to videos.
Here is one I like: How to Decoupage 1
And this one: How to Decoupage 2


STEP 2: CUT OUT THE LETTERS

Carefully cut out the letters that spell out the word you would like on your canvas.


I recommend using a large, clear, bold font such as Arial or Times New Roman as the letters are thick and easier to cut out. I printed mine in black and white because I thought it would look best with the prints I had picked out - but again feel free to pick which ever font and colour you like. I typed the letters into Word, made the font size large and printed them at home. I cut mine out with scissors as the letters were quite straight, however if you wish to use a more elaborate or loopy font then you may need to invest in a cutting mat and cutting knife to cut the letters out.

STEP 3: DECOUPAGE THE CANVAS

Decoupage the canvas in your selected print, ensure that the prints overlap the edge of the canvas and onto the back of the canvas for a nice finish. As always ensure you cover your paper in 3-4 coats of mod podge and wait 30-45 minutes before applying a new coat.

Decoupaged canvas, ready to have the letters added :)


STEP 4: DECOUPAGE THE LETTERS

Add the letters to the decoupaged canvas, to ensure the letters are placed in the correct position stand over the canvas when placing the letters down, as this makes it easier to see and correctly line up the letter. I placed the letters down by lining them up by sight, but feel free to use a ruler to help you line them up.

STEP 5: ADD EMBELLISHMENTS

Rhinestones!
Add your embellishments! I had some stick on rhinestones in my draw so I decided to add some of those to each letter. You can also use glitter (though this is a bit messy), stickers, felt flowers or anything else you like! Have fun with it!

Ta-da! Wall name art!


HANDY HINT: You can make this in any size you like - you can use small pieces of canvas with large letters like mine, or one large piece of canvas with a name/word/words. You can use any colours, any font, any words, any prints, any embellishments - the sky's the limit!


Have a project you created? Share it! Or feel free to post any questions in the comments section below!

HAPPY CRAFTING ALL!


Tuesday, September 16, 2014

Decoupaged Table

Decoupaged Table!


The same lovely friend who brought over that gorgeous jarrah coffee table (check out the 'Upcycled Table' post or the 'Upcycled furniture' page) - was kind enough to drop of this little coffee table/side table - how awesome is she?!

Original coffee/side table - kindly gifted by a friend :)
Now this little table isn't made out of a nice thick wood that you can sand back - instead it is a form of melamine wood (some people call it formica). Now I'm sure you're all thinking - well that's not very good, how do you plan to upcycle that if you can't sand and paint it?

Well - never fear all, we have plenty of options! With this kind of furniture you can spray paint, decoupage - or both! 

Now on the right you will be able to see a picture of the original table. As the table had some damage I decided to decoupage the whole thing from top to bottom to ensure that the damage would not be visible on the finished product.

HANDY HINT: 
Never decoupaged before and want to know how? No problem! Hop on youtube and check out some how-to videos.
Here is one I like:How to Decoupage 1
And this one: How to Decoupage 2


STEP 1: REPAIR

As you can see in the pictures, the top layer of the table was coming off on one side and the top layer on one of the legs had burst open. To repair these areas I pulled off any loose pieces of the top layer and then filled in the gaps with wood putty. I then left it to dry properly for a couple of days before I did any other work on it.
Damaged side and leg - were filled in with wood putty.


Step 2: Decoupage!

His Majesty (also known as Bay) decided to help with the repairs :)
Here's the fun part! Grab all your decorating tools - your mod-podge, your sponge brushes and your varnish spray and get decoupaging! 

Check out His Majesty Bay helping out with the repairs! And by helping I mean modeling for photos, sitting on the table and generally trying to get my attention by meowing incessantly at me hahaha :P


You can use any form of print you like to do your decoupaging. 
Here are some ideas:
* Magazine pictures
* Newspaper clippings
* Pages out of an old book 
Decoupage tools!
* Google pictures of your favourite celebrity
* Pictures from your favourite movie
* Favourite tv show/character 
* Pick a theme like summer/flowers/animals
* Use memes like in the 'Upcylced table' post

 I used 3 sets of prints which I bought online. You can buy uniquely designed digital copies of prints online from www.etsy.com. I used a set from my favourite shop. I also have many other print sets from that shop for various projects.

I turned the table upside down and covered the legs first, then bottom side of the table. When that was complete I covered the top. As always, ensure that you cover the table in 3-4 layers of mod-podge to ensure that it has a thick covering, let the table dry for at least 30-45 minutes between each coat of mod-podge. It is best to leave mod-podge to dry for 24-40 hours, to ensure that it drys completely, then cover the surface with a decoupage varnish.
 
HANDY HINT: Want to buy prints like mine online? No worries! Head over to www.etsy.com and search for digital prints. Check out Cherry Pink Prints - my favourite store and the place where I found my Paris themed picture sets :) 

Table - sitting in the living room :)

STEP 3: DISPLAY!

 I placed my table in the living room, between the couches to use it as a side table.
It makes a lovely feature :)

It would also look awesome in an entrance, at the end of a hallway with a plant on top or even as a little coffee table between two one-seater sofas. 

Close-up of the table top.


Have any decoupage theme ideas or projects that you want to share? Have any questions for us? Just leave us a message in the comment section below!

HAPPY CRAFTING ALL!


Saturday, September 6, 2014

Upcycled Wooden Table

UPCYCLED WOODEN TABLE


'For the love of wood' don't throw away that old wooden furniture! Give it new life instead!
Classic wooden furniture is always gorgeous as it is beautifully styled to begin with. So if you have something old and worn lying around, give it a make-over and use it to add colour or a new feature to a room!

A friend of mine had an old jarrah coffee table lying around - she knew that I upcylced furniture and happily dropped it off at my place one day.
I couldn't believe how lovely it was! Sure it had scratches all over it - but it was jarrah! (A strong, dark and hard wood found in Australia.) The table had no dents in it, no pieces/legs missing and no parts of it were loose. It was a fantastic piece!
Here is the before photo:

 
Before photo - original table :)
Close up of the table top - as you can see it was severely scratched.
Now this particular table I decided to paint and decoupage - I upcycled it for another friend and gave it to her as a birthday present so the colour  and style
chosen was based on the person it was being made for. So feel free to use any colours, pictures, style or design you prefer.
Below are the steps to upcycling this wooden table: 

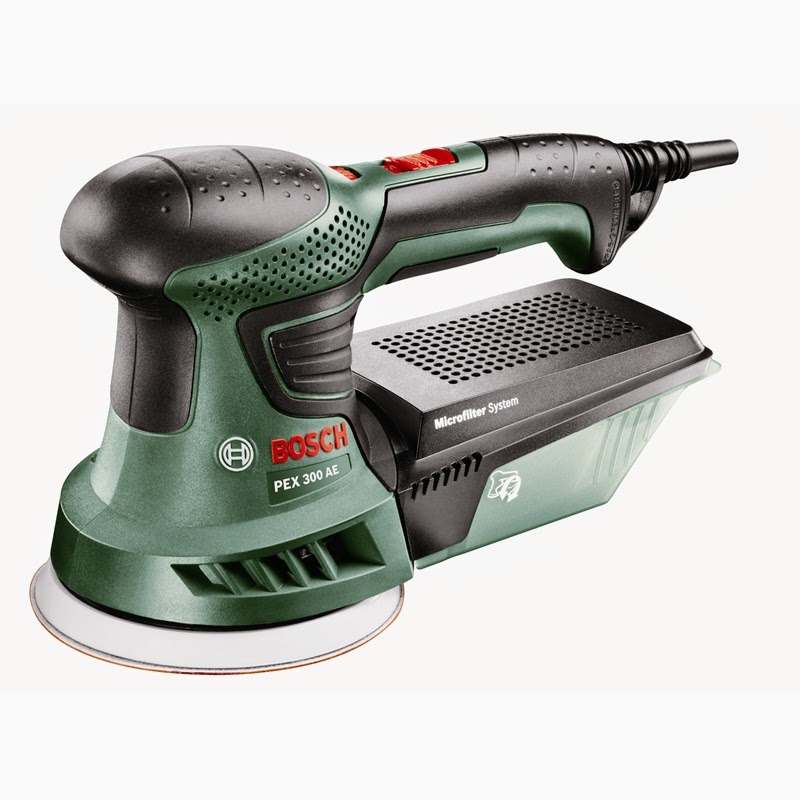
My orbital sander.

1.) SAND THE TABLE


You need to remove the shiny top-coat of lacquer on the wood before you can repaint it - if you do not remove it the paint will not stick properly to the wood and will peal off easily.
I can't stand sanding by hand it takes far to long - so I used an orbital sander (you can find them at your local hardware store - a bit pricey between $100 - $200 - but well worth the investment!).
I have a Bosch orbital sander (pictured here) - don't forget to also use a pair of safety glasses, safety gloves and a small face mask/disposable respirator for protection against dust.


The orbital sander only lets you sand flat surfaces, so for the legs and crevices you need to either sand by hand using sand paper OR purchase a sander that has small attachments for reaching corners and small places.


HANDY HINT: After you have sanded wipe the surface of the table down with a wet cloth to remove all the dust - that way you will have a clean surface to paint on :)


2.) PAINT THE LEGS, SIDES AND BOTTOM


I decided to not only repaint this table - but to decoupage the top of the table as well - to add colour, style and character. So I DID NOT paint the table top as I wanted to decoupage that later.


HANDY HINT: Painting tends to be messy- so always paint first before you decoupage. Try not to paint the surface that you are going to decoupage as the decoupage glue sticks best to a bare wooden surface. However if you do get some paint on the surface (like I did in the table top edges) don't worry too much the glue will stick to a painted surface as well.

I decided to paint my table white - partially because that was the paint I had available and because it was the most suitable colour for the style I had in mind.

You need to use an undercoat of paint or primer first - my undercoat was white and 1 layer of it is sufficient. I painted this using a normal thick paint brush. Make sure you cover all areas of the table that you wish to be painted. So in this case it was the legs and slats underneath. Turn the table upside down to paint underneath it as
well. Then give the undercoat at least 24 hours to dry.

Then you can start painting the top coat on - personally I find it easier and quicker to sponge on the paint than to paint it with a paint brush - so I just used a kitchen sponge to dab on my paint. This particular table required about 3-4 coats of paint. Make sure you let each layer of paint dry for at least 24 hours before adding another coat.

Painted and ready for step 3!
HANDY HINT: No idea which paint is what? Same here! No need to stress, to find the best paint for your wooden furniture upcycling DIY projects just head to your local hardware store and ask the friendly staff there to help you find some paint for your project - all you need to tell them is 1.) What furniture your upcylcing (so they know how much paint you will need) 2.) the colour you wish to paint it (so they can help you find the right one) & 3.) just remind them that you will need both primer and a topcoat (so that they can help you find both) :)


This is what your table will look like when the painting is complete and the table top is ready for decoupaging.
Mod Podge - decoupage glue


3.) DECOUPAGE


To decoupage your table top you will need some Modpodge (best decoupage glue around), some foam brushes (by Mont Marte) (or a paint brush) to apply the glue and the pictures that you want to apply.

You can choose any pictures you like! You can print out pictures of princesses if you are decoupaging furniture for your little princess, pictures of your pets, or magazine pictures, or just pages from an old book?


Foam brushes

I went on facebook and found a set of memes that were specific to the person I was making the table for - I printed these pictures out in colour and cut them out so that they were ready to go. I also covered the painted parts of the table in scrap paper to protect them from getting mod podge on them - there is no need to do this, I just have a bad habit of getting mod podge everywhere! :P


Table legs covered up with scrap paper to protect them from Mod Podge!
I then covered my table top in with the pictures - I arranged them to face all different ways to that no matter which side of the table you are on you can read a meme. I covered the table in 2-4 coats of mod podge - ALWAYS let the layers of mod podge dry for at least 45 minutes before applying another coat, this will reduce any bubbling. Then I let the table top dry out properly for about 2-3 days. Finally I covered it in a decoupage varnish (this can be purchased from your local craft store or online).

HANDY HINT: Never decoupaged before and want to know how? No problem! Hop on youtube and check out some how-to videos.
Here is one I like: How to Decoupage 1
And this one: How to Decoupage 2
 This is the finished table!
Ta da! All done!
Close-up of the table top :)


All wrapped up and ready to go!
If you have any questions or would like to know where to buy any of the products or equipment I used, then please leave a question in the comments section below!

Happy Crafting all!